Just before I get down to business a few small titbits that I thought you would find interesting. I have decided that time has come for me to be more assertive about getting the Aussie Hero name around Canberra so that those that need to know are aware of what we are doing. First I called the Chaplain at Richmond to chat and see if they could refer me to a contact in Canberra!!! BINGO! Just so happens that the Chaplain I spoke to has just returned from "over there" and is actually the owner of an Aussie Hero Quilt! AND it seems that one of the other Chaplains that was "over there" will be returning to work in the fullness of time - to a job in Canberra! Beauty! Hope they don't mind hearing from me again!
Another lovely little titbit - through facebook a lady from the RAAF Base at Edinburgh in SA contacted me and requested a quilt for a female member who is serving "over there" at the moment. That was no problem and I assured her that if there was anyone else just to let me know. She has just come back with a name for me - and guess what!!! She has already received a quilt! LOVE IT! Additionally there is a Quilt Group in SA that is near the base and they are going to endeavor to make quilts for the folks from Edinburgh that are going to be "over there" for Christmas!
Excellent!
Ages ago I showed you this quilt that I made for Belvedere's boss and some of you asked for a tutorial. I am sorry it has taken me so long to get to it but I have been flat out. At the moment I am working on another request quilt or a different design but it also uses the stars so I thought I would kill two birds with one stone and make a tutorial whilst I made the blocks.

And NO you clever people out there who read my other blog this is not the BOM for July. That one is dedicated to the folks in Egypt and that is all I am going to say! LOL!
So, on to the tutorial.
I love these stars. I use them for so many things and I like to make them so that they can be trimmed to size and you don't have to worry about losing the points. You will see I do a lot of blocks like that.

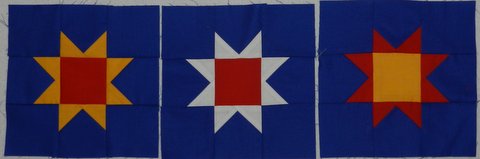
First you have to do some cutting. Blue is my background colour in this example, yellow the points and red for the centre. Start by cutting eight 3" squares from the background colour and one 3" square from your centre colour. Then cut eight 2" squares from your point color.
Next take your 8 point squares and, using a pencil or chalk, draw a line diagonally from one corner to the other. This is your sewing line.

Place one yellow square in the corner of four of the blue (background) squares

and sew along the line.

Like so!

Cut away the extra.

Iron the yellow square open so your square looks like a square again!

Next take the four remaining yellow point squares and place them on an adjacent corner and again sew along the line.

Again cut away the extra and iron the yellow square over to get back to having for squares again.

Take your four remaining blue squares and sew on each side of TWO of your squares with yellow points. Take the two remaining squares with yellow points and sew one on each side of the red centre square.

Now here is an important part if you want it all to fit together nicely - the centre row with the four yellow points and the red centre - iron the seams towards the red centre.
You will end up with less bulk that way. The outer rows with the yellow points and the two blue squares -iron away from the yellow points - again less bulk.

You will see in the next photo that the seams face away from each other and therefore will be less bulky when sewn together.

Now take one of the outer rows and pin it to your centre row.

Make sure your seams align and pin so that they don't move during sewing. Repeat with the final row.

You will now have someething that looks like this and needs ironing. Which ever way you iron it you will get some bulk where the yellow points intersect with the red. Decide how you are going to iron the seams and stick with it for all the blocks.

Turn it over and this is what you have. These blocks are around 7 1/2 inches depending on whether you used you quarter inch foot or not. I am planning to trim these blocks to 7 inches to make them fit my project better. You can also trim these down to 6" or 61/2" if that suits your purpose.

So now we are half way to the tutorial for the red quilt above. For that quilt I trimmed the stars to 6 1/2" to fit in with my 6 1/2" strips.
Don't forget our
Aussie Hero Sewing Day in Penrith this Saturday.
All the details are found here. Leave me a comment or send me an email if you think you can make it.
Till next time...................keep spreading the word and happy stitching!
Good tutorial Jan-Maree, I hadn't come across making a star that way before, good that you can trim it back if required as well.
ReplyDeleteGreat idea Jan Maree. I usually avoid stars due to losing their points. Brilliant.
ReplyDeleteDebra
Click here to download a pdf version of this tutorial
ReplyDelete